The reason this happened is because your website is using some custom CSS (either manual or from your theme), and this is impacting what is written in the output. As the output is interpreted, it’s sometimes embedded into an HTML element, thus leading to this display where your website’s CSS automatically overrides it.
You can add a custom line of CSS to ensure the output of the form is always white.
You can override this only for the form outputs by using the following CSS:
.mwai-form-output > p { color: white !important; }
If this also happens in the chatbot, you can use something like this:
.mwai-text > span > p { color: white !important; }
No Line Breaks In The Chat
Elementor or other third party builders containers tend to override some CSS values. If the response is not formatted properly and looks like a single line / no line breaks, you can use the following CSS to fix that:
.mwai-text {white-space: break-spaces;}
If this doesn’t work, you can also try:
.mwai-text {white-space: initial;}
.mwai-conversation { text-wrap: wrap; }
Long Response Times
The plugin is not responsible for it; execution takes just a very few milliseconds on the plugin side. The problem is the distance between you and your server, as well as between your server and OpenAI’s server, and then the availability of OpenAI.
Make sure that your server is not slow either; if you have a lot of plugins installed and doing things, that will also slow down the time before the AI Engine actually starts interpreting the request.
But performance-wise, it is on the networking side. If you are using Embeddings, making multiple requests, sending big requests, passing security filters, and so on, it will increase the requesting time.
Reply Sent By The Server Is Broken
This is a generic error when requests don’t get handled well by your server and are then broken. Please look inside your PHP logs for any clues. Also, you can try to disable any other plugin that might interfere with the request (like cache and optimization plugins).
If you don’t understand what the error means in your PHP error logs, you can contact support and include your log file so we can help you sort it out.
CURL Errors
This SSL error is related to an issue at your hosting service level. On our side, unfortunately, we can’t do anything. Except for giving you a refund, but we are sure you would prefer it to work
Usually, this error message indicates an SSL connection error, which typically occurs when your server has an outdated cURL package or SSL protocol. It’s also possible that there’s a firewall on your server. Your web host provider should have more information about this issue.
You could also try to update your PHP version, that might be the root of the problem.
Could not resolve host
This isn’t an error caused by your OpenAI account or a plugin issue — it’s most likely that your server can’t communicate with the OpenAI API. The message cURL error 6 specifically means “Could not resolve host”, which usually points to a DNS resolution issue on your server.
You might want to:
Check with your hosting provider to ensure external requests (like to api.openai.com) are not blocked.
Confirm your server’s DNS settings are correctly configured.
Make sure there’s no firewall or security setting preventing the request.
You Exceeded Your Current Quota
AI Engine doesn’t come with pre-built AI models, you gotta connect with OpenAI. You don’t have to subscribe (like ChatGPT Plus), but you gotta set up your billing details on OpenAI. They offer their API services on a pay-as-you-go basis.
When you sign up for an account on OpenAI, make sure to set up your usage limits and payment method to use the API smoothly.
Just a heads up, if you decide to pay for ChatGPT Plus (which is totally optional), it’s a separate service and not required to use the API.
You can test if everything is working directly inside the OpenAI playground (not chatGPT) before AI Engine.
Please head to the following pages and ensure everything is setup correctly :
If you don’t see this message in the Playground but do inside of AI Engine this means you probably have a cache or optimization plugin that cached this response, please disable any plugins that migth do that.
Please note that OpenAI limits the usage of their services. API usage is subject to rate limits applied on tokens per minute (TPM), requests per minute or day (RPM/RPD), and other model-specific limits. Your organization’s rate limits are listed here:
Please make sure you are within your limit usage for what you are trying to use.
Using ChatGPT with GPT-4 doesn’t mean your OpenAI account has access to the GPT-4 model using the API. You need to fund your account with $10 and have at least one dollar in billing to unlock access. These are restrictions from OpenAI, not the AI Engine.
Common Issues
Embeddings Issues
Greyed Out Buttons
If you can’t use the Add button because it’s greyed out, it’s simply because you haven’t selected an environment to work with. On the right-side panel, there’s a dropdown menu—if it still says “Select”, it means no environment has been chosen yet. Select the environment you want to use, and the Add button will become active.
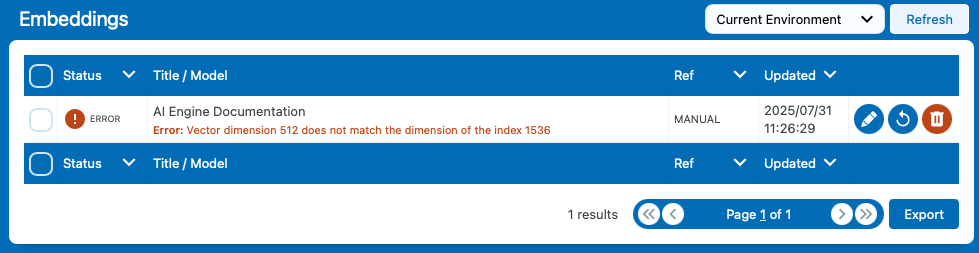
Error Icon
When adding a new embedding, you might see an error icon. This indicates the embedding could not be added due to an unexpected issue. You can simply view the specific error message in red. This message will help you identify and resolve the problem quickly.
Commun Errors
A valid URL was not provided or Unauthorized: Malformed domain – Unauthorized (401)
This means your Pinecone server domain is incorrect. Please double-check the host URL in your Pinecone account and ensure it’s set correctly in AI Engine. If the domain is correct, your API key might be invalid or expired, or your project settings may have changed.
Error code 3: Vector dimension 1536 does not match the dimension of the index 1024
This means that when you created your index, you chose a dimension that does not match the one used by your Embeddings model in AI Engine. There’s a mismatch — either change your Embeddings model to match your vector size, or delete your index and create a new one that matches the model you’re using in AI Engine. Make sure to follow the documentation when creating your index to avoid this issue.
If you’re not sure what your error message means, please contact support so we can help you identify and resolve the issue directly.
Embeddings are not used
First, make sure that you understand that the chatbot is not searching through the embeddings for information. The user query is vectorized, and matching embeddings are added to the chatbot context if a match is found. You can read this article to learn more.
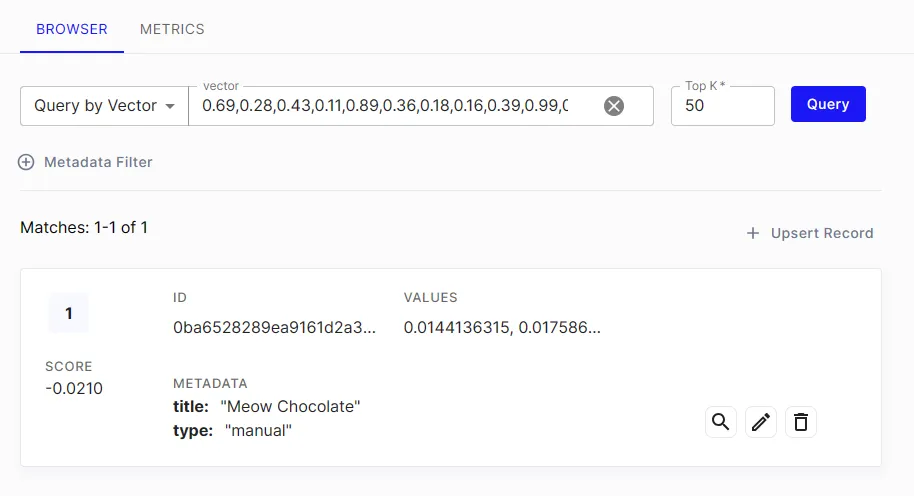
In the Knowledge tab, you can enable the “Query” mode, which lets you enter a query like a user would in your chatbot. For example, “What do you know about …”, and this will show you which embedding entries are found as matches, along with their matching scores.
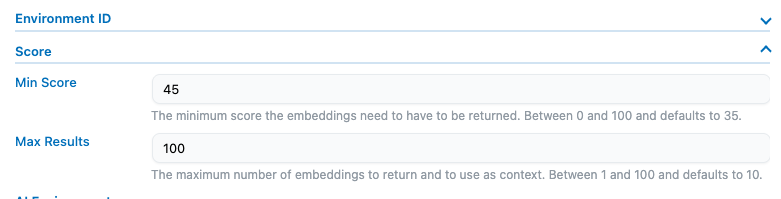
In your Knowledge environment settings, make sure the minimum score is high enough; if it’s too low, no embedding at all might be picked up. Also set the maximum number of embeddings that should be added to the context.
Sometimes your query might not be precise enough for a vector to be returned. Be sure to use terms that match what you are looking for.
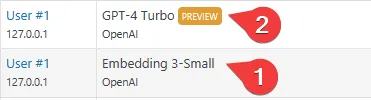
It’s a good idea to check whether embeddings are being queried at all. This means verifying if AI Engine actually sent a request to transform the user’s input into an embedding in order to match it with content from your vector database. You can use the “Insights tab” to ensure queries are being sent.
You should see a (1) request made from an embedding model to fetch the data from the vector database and a (2) request that matches the ai model of your chatbot:
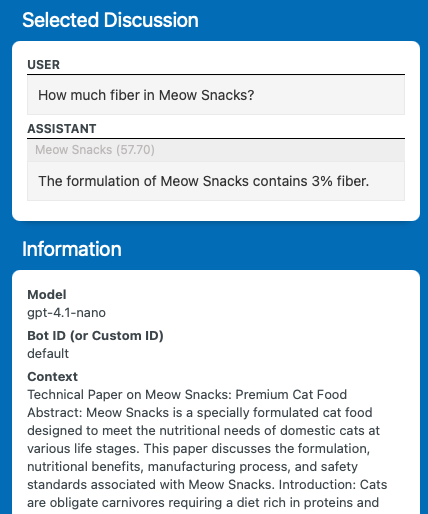
Then, you can use the Discussion tab to directly see which embeddings were found and added to the chatbot context. These will appear in gray just above the chatbot’s response. You can also inspect the content of each embedding by checking the Context section under Information.
Please ensure that there is adequate space within your context for your embeddings. Under Settings > Others > Advanced, you will find the context max length parameter, which determines the number of characters your embeddings will occupy in the context. If this setting is empty, it will be considered as 0, which means that the embeddings will occupy 0 tokens and, consequently, won’t be used. If it is too low it might cut off your embeddings thus having a context that doest really help your chatbot.
All the embeddings are stored locally in the wp_mwai_vectors table. You should be able to view them here and perform manual operations if needed. It could be a faster approach to delete all embeddings at once instead of using the AI Engine embedding table. If you are unsure about what you are doing, it is recommended to create a backup using a reliable tool like the excellent BlogVault.
If everything seems to work fine but you are still not getting the answer you want, this might be because of the behavior of the model you are using. Sometimes, contextual data is ignored if the model judges it irrelevant or if the instructions you are using are contradictory and/or unrelated.
On Pinecone
If you are using Pinecone, you can log in to your account and look inside your index directly to see how many vectors are inserted in each namespace. It should be updating in real-time, so you can check the difference with what’s showing up on AI Engine.
If you are using the Pinecone free tier services, please note that inactivity of 7 days will result in the termination of your Pinecone Project. To ensure it still exists, please connect to your account.
Orphan Vectors
If some “N/A” or orphan embeddings are created, it may be due to discrepancies between your database and the Pinecone registry (learn more at the bottom of this documentaion). You should be able to delete them manually until they are all gone. If it keeps happening, look inside your PHP logs for any errors. If there are too many of them, please refer to the last part of this documentation. Try to change or refresh your index and namespace.
The Pinecone database contains only vectorized data, which means that by itself, it’s essentially a collection of numbers that can’t be directly used. This is why the AI Engine also utilizes your database to store the corresponding vectorized values in a textual format. You can think of the AI Engine’s database as a translation book for your Pinecone Database. Therefore, it’s important to ensure that both databases have the same number of entries.
When there’s a discrepancy between the two databases, you might encounter orphaned vectors appearing in the ‘Embedding’ table. This indicates that a result was returned from a request to Pinecone, but no corresponding textual value (translation) was found in your database. In such cases, you can either add the missing value or remove the orphaned vector to maintain a clean dataset. In some instances, Pinecone may store the textual value in metadata, and the AI Engine will automatically use it to create a valid ‘OK’ embedding.
To initiate this process, you can use the ‘Sync Pull’ option, which requests Pinecone for every vector saved, allowing you to either clean them or fill them with the corresponding textual data.
CURL / SSL Related errors
SSL related errors are related to your hosting service. On our side, unfortunately, we can’t do anything. Except for giving you a refund, but we’re sure you would prefer it to work .🙌
Usually, this error message indicates an SSL connection error, which typically occurs when your server has an outdated cURL package or SSL protocol. It’s also possible that there’s a firewall on your server. Your web host provider should have more information about this issue.
Embeddings Are Not Auto-Synced
If you notice that your embeddings are not updating automatically in the AI Engine plugin, it could be due to WordPress cron jobs not running as expected. This guide will help you understand the possible causes and how to resolve the issue.
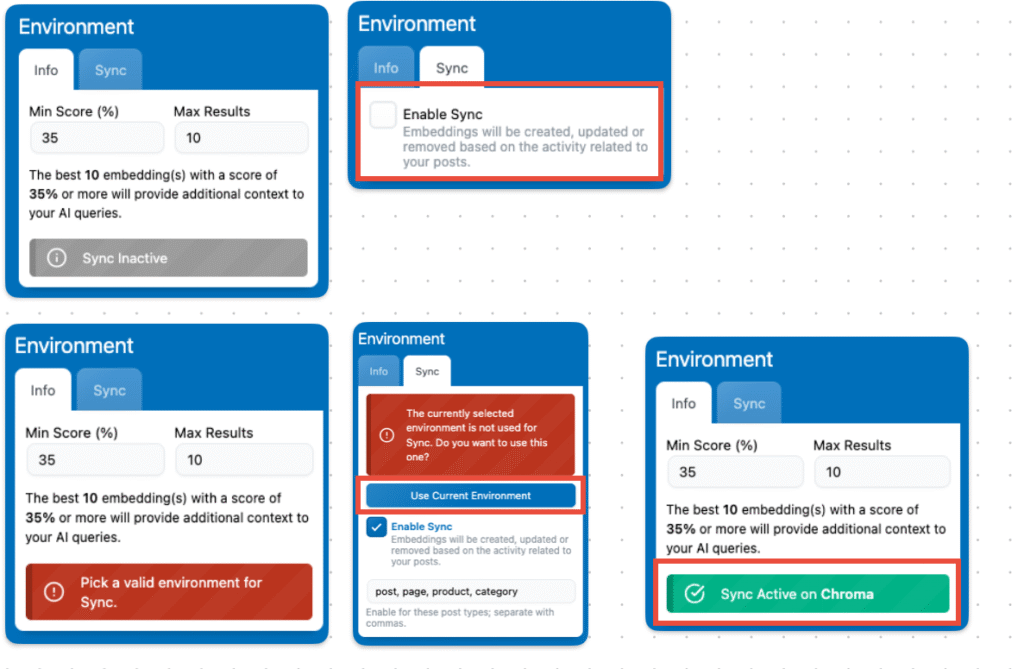
First, make sure you have enabled the sync for your current environment. Go to the Knowledge tab and make sure that the current environment you want to be synced is selected.
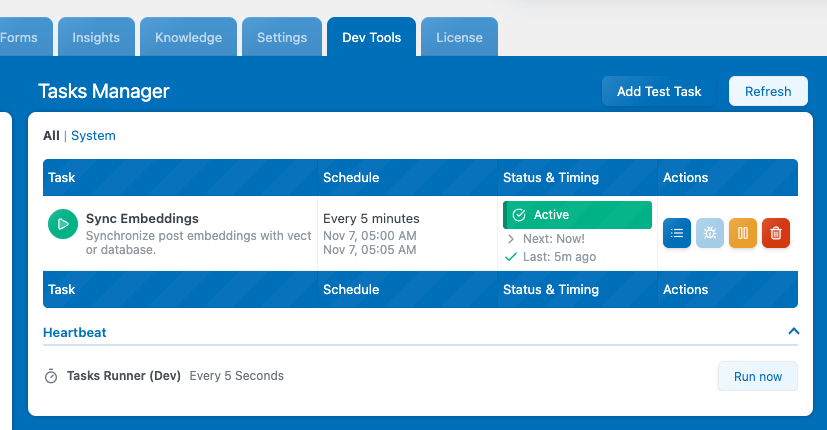
Make sure to enable the Dev Tools from the settings. This will allow you to check the actual Sync Task.
Make sure it says “Active” and not “Error“. If it says “Error“, you can open the logs by clicking the list button and check for any specific error message there.
You can click the Play button to manually trigger the Sync task, which should sync your STALE entries and set it to Active again if the last run caused an error. You can also delete it and refresh, or use the “reset” task button in the dev options to start fresh.
If your post was updated through something external — like an ACF meta field or content handled by a page builder(rather than directly in the post content) — the corresponding embedding might not be detected as updated. As a result, it won’t be marked as outdated and won’t trigger a sync automatically.
Read this documentation to ensure your content is parsed.
If there was an issue and the server crashed during the last embedding sync, it’s possible that the mwai_embeddings_tasks_sync transient still exists in your database.
This transient is created right before the sync begins and is normally deleted afterward to prevent multiple sync processes from running at the same time. But if the process was interrupted, the transient might remain, effectively blocking any new sync attempts for several minutes.
To fix this, make sure to manually delete the mwai_embeddings_tasks_sync transient from your database before attempting another sync. This will clear the block and allow the sync to proceed as expected.
Possible Server Side Causes
WordPress Cron Jobs Not Running: The AI Engine relies on scheduled events (cron jobs) to update embeddings every few minutes. If these cron jobs aren’t running, embeddings won’t auto-sync.
Server-Level Password Protection: If your website (including wp-cron.php) is behind a server-level password protection (like cPanel directory privacy), it can prevent cron jobs from executing.
Plugin Conflicts: Security, caching, or optimization plugins might interfere with scheduled events.
Misconfigured wp-config.php: Disabling WP-Cron in the configuration file stops all scheduled tasks.
How to Diagnose Cron Issues
If you need to dive deeper into debugging crons, you can follow these steps:
Install WP Crontrol Plugin
Step: Install and activate the WP Crontrol plugin.
Purpose: This plugin lets you view and manage all cron events in WordPress.
Check Cron Events
Navigate to: Tools > Cron Events in your WordPress dashboard.
Look for:
The mwai_5mn event (used by AI Engine for embeddings).
Any errors or warnings next to scheduled events (e.g., HTTP 401 errors).
Identify Errors
HTTP 401 Errors: Indicates unauthorized access, possibly due to password protection blocking wp-cron.php.
No Scheduled Events: Suggests that WP-Cron might be disabled or not functioning.
Solutions
Remove Server-Level Password Protection
If your site is password-protected at the server level (e.g., via cPanel):
Disable Directory Privacy:
Log in to your hosting control panel.
Navigate to Directory Privacy or similar.
Remove the password protection from your website directory.
Alternative: Use a WordPress plugin like Password Protected to restrict site access without blocking wp-cron.php.
Check for Plugin Conflicts
Disable Other Plugins:
Temporarily deactivate security, caching, or optimization plugins.
Check if embeddings start auto-syncing.
Reactivate Plugins One by One:
Identify if a specific plugin is causing the conflict.
Verify WP-Cron Is Enabled
Check wp-config.php:
Access your website files via FTP or a file manager.
Open the wp-config.php file.
Ensure there’s no line that says define('DISABLE_WP_CRON', true);. If it exists, remove it or set it to false.
Use an External Cron Job
If you prefer or if WP-Cron isn’t reliable:
Set Up a Server Cron Job:
Schedule a cron job on your server to call wp-cron.php at regular intervals.
This bypasses the need for visitors to trigger cron events.
Confirm the Fix
Edit a Post: Make a change to any post to initiate the embedding process.
Visit Your Website: Load any page to trigger WP-Cron (if using WP-Cron).
Check Embeddings:
Go to AI Engine > Embeddings.
Verify that the embeddings have been updated.
Embeddings not auto-syncing is often due to issues with WordPress cron jobs. By ensuring wp-cron.php is accessible and cron jobs are running correctly, you can resolve the issue and keep your embeddings up-to-date automatically.