When Should I Use AI Forms?
If you have a scenario where you need to generate a custom response based on user input, whether it’s a quiz or a decision tree, AI Forms can be a great solution.
It’s much easier than trying to train a chatbot step by step to reach a single outcome.
Barebone Example
How To Use AI Forms ?
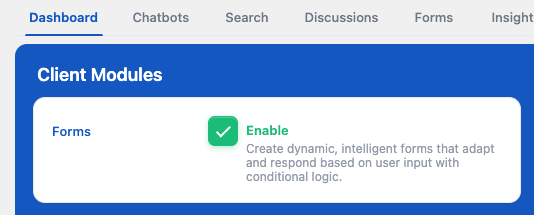
To build AI Forms, you first need to enable the Client Module “Forms”.
AI Forms are built using Gutenberg Blocks. Each component of the form is its own block with its own settings, and they can reference each other, act as parents, and create conditional logic between them.
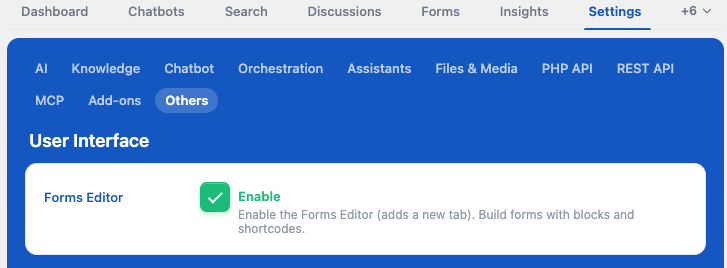
Since this relies on Gutenberg, if you’re using a third-party builder you won’t be able to create a form directly within your post. In that case, you can use the Forms tab (by enabling the Forms Editor in the plugin settings) to build forms there and then embed them in your posts using the related shortcode.
Fields Showcase
Here is a form built directly on this page so you can see all the different types of inputs you play with.
The Submit button will be disabled as long as the required field is empty.
AI Form Blocks
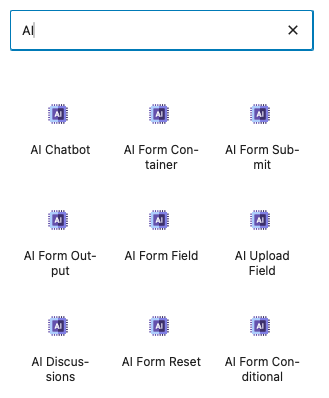
Once you have the AI Forms feature enabled, you will have access to new blocks. You can search for “AI” and find them all listed.
Form Submissions
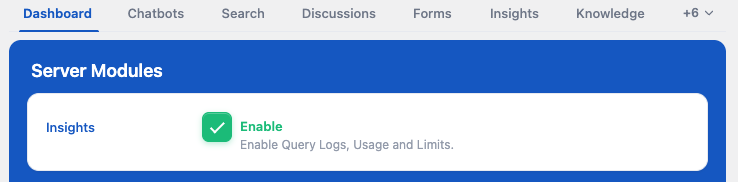
If you want to see the data submitted through your forms by your users, enable the “Queries Form Data” option to display it in the Insights tab. This will let you review exactly what information is being sent in each form submission.


If you want to receive email notifications whenever a form is submitted, instead of checking the queries manually, you can use the Notifications addon. It will automatically send you an email each time a new submission is received.
Form Structure
When creating a new form, you should start with a container. Without it, the form will appear like raw HTML without any styling.
The container also provides a pre-made template you can use to get started quickly. We will use that default template to explain how it works.
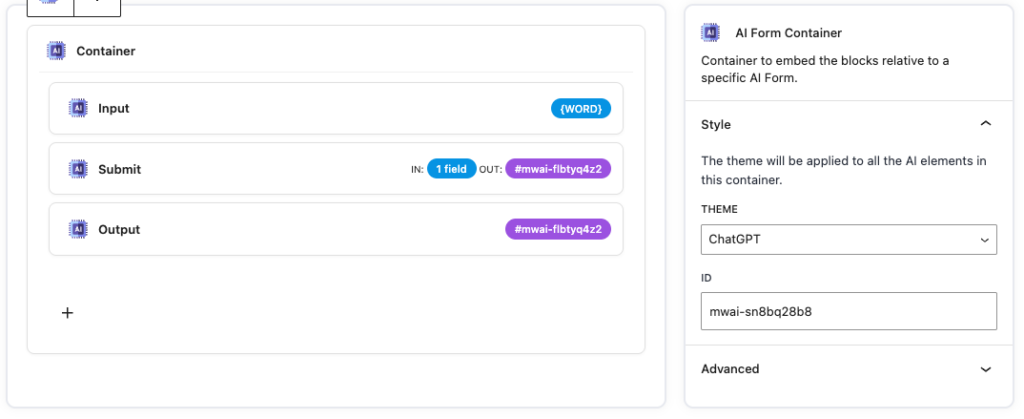
Each block has its own settings. Select a block by clicking on it, and in the right-side panel you’ll find all the available settings you can modify.
The flow should be as follows: the container holds all fields, all inputs are referenced in the submit prompt (your instructions sent to the AI), and the submit defines where the output should be written (the output field).
[ Container ]
      |
      ├── [ Input Field 1 ]
      ├── [ Input Field 2 ]
      ├── [ Input Field 3 ]
      |
      └── [ Submit Prompt ]
              |
              ├── uses → {Input Field 1}
              ├── uses → {Input Field 2}
              ├── uses → {Input Field 3}
              |
              └── sends to AI
                       |
                       ▼
                [ AI Response ]
                       |
                       ▼
                [ Output Field ]
Building a Prompt
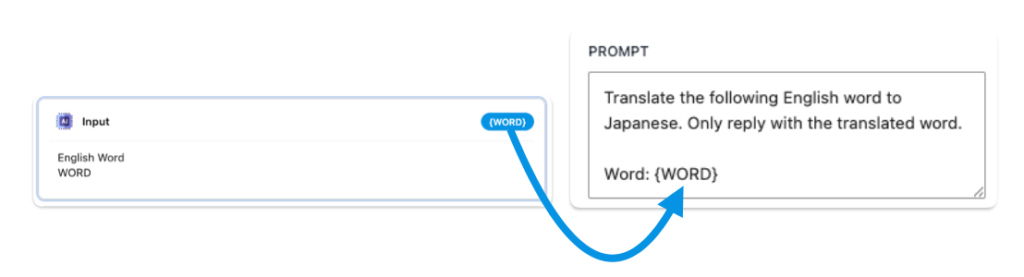
Building an AI form prompt is done in the Submit field. You’ll find a text area where you can create your prompt template.
To include user inputs in the prompt, simply add the field name in curly brackets, like {WORD}. It will automatically be replaced with the user’s input.
For example, if the field WORD has the value cat, then:Word: {WORD} → Word: cat
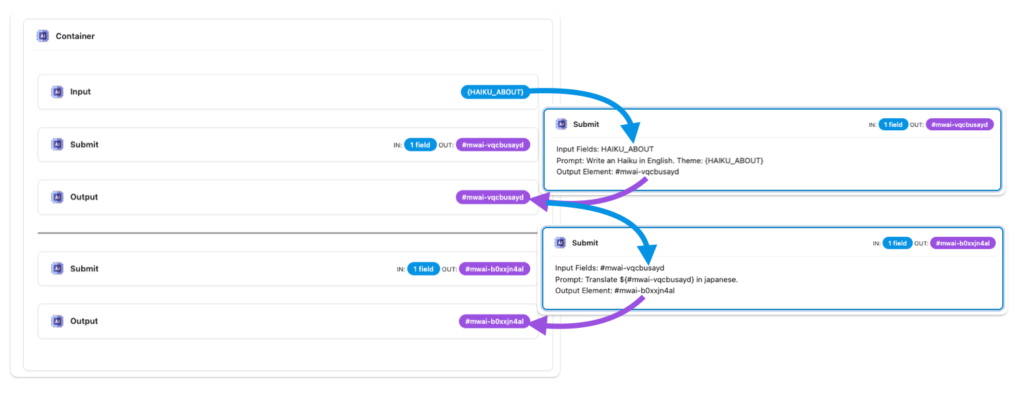
You are not limited to your own form fields. You can also use query selectors.
For example, if you have a predefined value on your page, you can target it using ${#myfield}. This could be another form’s output, allowing you to reuse a previous result as an input in a different form.
Form Output
Each Submit field should have an output defined. In the Submit field settings, you’ll find an “Output Element” option that needs to be filled.
This field expects a query selector, which means you can display the output anywhere on your page. For now, you can simply use the AI Forms Output field as your target.

When using an Output field, you can simply copy and paste the purple ID into the Output Element of your Submit field.
Make sure you don’t forget the
#, as this is a query selector, not just a field name reference.
Advanced Forms
You can also use other AI Forms blocks to create more advanced prompts and behaviors.
Model and Context Params
In the Submit block, where you define your prompt, you can also adjust the context and model parameters.
You can:
- Choose which model to use for the prompt
- Decide whether to use a Knowledge environment
- Select MCP servers if needed
If you already have everything configured in a chatbot and want to reuse that setup, you can enable Chatbot Mode and select it. This will run the form’s final prompt through your chatbot instead of using the default parameters.

Conditionals
Conditional blocks can be used to check the value of one or multiple fields. If all conditions are met, they will display their child blocks (not only AI Forms fields, but any block inside them).
For example, you could have two conditionals checking the value of an input like “word”:
- If the value is “cat”, you show a submit with prompt specific to that case
- If the value is “dog”, you show a completely different submit with its own prompt as well
This way, it’s almost like having two forms in one, each with its own logic and behavior depending on the user input.

Here we use conditionals to display different Submit fields, but you can also make fields depend on other fields. For example, one input can appear only if another field has a specific value.
Filters
AI Forms also sends an event when a form is submitted, so you can create your own custom behavior based on that submission using this filter:
MwaiAPI.addFilter('ai.formReply', function (reply, args) {
  const { formId, sessionId, contextId } = args;
  return reply + ' For more information, visit [Meow Apps](https://meowapps.com).';
});
This requires some technical knowledge, but it allows you to build very specific behaviors.
For example, you can react to a form submission, check the result, and then dynamically display new fields. This could include showing another Submit block with a new prompt based on the previous output.
Here is how it is done here:
setTimeout(function () {
  const field1 = document.querySelector('#mwai-k0rq100s6');
  const field2 = document.querySelector('#mwai-b0xxjn4al');

  if (field1) field1.style.display = 'none';
  if (field2) field2.style.display = 'none';

  MwaiAPI.addFilter('ai.formReply', function (reply, args) {
    const { formId, sessionId, contextId } = args;

    if(formId != "f5a26dbe26cb08f2486ea274ea16dcaf") return reply;

    const field1 = document.querySelector('#mwai-k0rq100s6');
    const field2 = document.querySelector('#mwai-b0xxjn4al');
    const fieldToHideAfterSubmit = document.querySelector('#mwai-24mndzrb3');

    if (field1) field1.style.display = '';
    if (field2) field2.style.display = '';

    if (fieldToHideAfterSubmit) {
      fieldToHideAfterSubmit.style.display = 'none';
    }

    return reply;
  });
}, 1000);
Autofill
You can also autofill values if you already have predefined content available, such as user information.
Here is an example: when clicking the button, it automatically sets the input value based on the current page content, but it could really be anything depending on your use case.
My name is NyaoForm fields are actually wrapped inside <fieldset> elements, not direct <input> elements themselves.
So to dynamically update the value, you first need to find the actual <input> or <textarea> inside the fieldset before modifying it.
Here’s a code example:
<span id="custom-content">My name is Nyao</span>

<button style="margin-left: 15px"id="copy-btn">Copy to input</button>

<script>
  document.getElementById('copy-btn').addEventListener('click', function() {
    var span = document.getElementById('custom-content');
    var fieldset = document.getElementById('mwai-0xl7ikx7s');

    if (!span || !fieldset) return;

    var text = span.innerText.trim();

    var input = fieldset.querySelector('textarea') || fieldset.querySelector('input[type="text"]') || fieldset.querySelector('input');

    if (!input) { alert('No input found inside fieldset'); return; }

    input.focus();
    input.value = text;
    input.dispatchEvent(new Event('input', { bubbles: true }));
    input.dispatchEvent(new Event('change', { bubbles: true }));
  });
</script>