You can do that by using the mwai_ai_reply filter. This filter is triggered every time before the chatbot sends a response to the user, giving you the opportunity to run custom processes or modify the output just before it’s displayed.
For example, if a user asks about their shipping status, you can intercept the reply, append relevant delivery information, and even include a link redirecting them to their order page. We are forcing this data into the reply so this might be good example if you want all of your chatbot messages to have a footer of some kind showing specific information that YOU wrote.
Note that this filter only modifies the reply after it has already been generated by the AI model—it does not affect the model’s input or context. Think of it as a post-processing step, not something that influences the AI’s reasoning. If this what you want, you can modify the Query instead.
add_filter('mwai_ai_reply', 'my_mwai_reply', 10, 2);

function my_mwai_reply($reply, $query){
	// First we'll check if the user is talking about their shipping number.
	$last_message = $query->get_message();
	$keywords = ['shipping', 'number', 'track', 'order', 'delivery'];
	$is_shipping_query = preg_match_all('/' . implode('|', $keywords) . '/i', $last_message) > 0;

	// If it's the case, we will get the user's last order from our database.
	if ($is_shipping_query) {
		$user = wp_get_current_user();
		// We'll get the last shipping number from the user's meta. You could also get it from your database.
		$shipping_number = get_user_meta($user->ID, 'last_shipping_number', true);

		//if we have a valid shipping number, we'll check our Zapier webhook to get the latest status of the order.
		if ($shipping_number) {
			$zapier_url = 'https://hooks.zapier.com/hooks/catch/shipping_number/status/';
			$zapier_response = wp_remote_post($zapier_url, array(
				'method' => 'POST',
				'body' => array(
					'shipping_number' => $shipping_number
				)
			));

			$estimated_delivery_date = $zapier_response['estimated_delivery_date'];

			// We'll return a message to the user with the estimated delivery date and a link to the order page.
			$reply->set_reply("Your order will be delivered on $estimated_delivery_date. You can track your order <a href='https://myshop.com/orders/$shipping_number'>here</a>.");
		}
	}

	return $reply;
}
Use Function Calling
First, read the “Function Calling Overview” documentation to understand what Function Calling and Code Engine are. If you don’t, you won’t understand what happens next or how to customize things yourself.
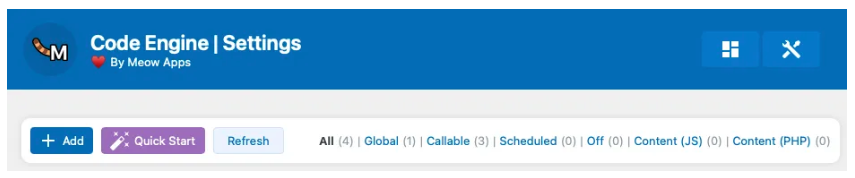
Let’s get started by going to the Code Engine dashboard. Click the “+ Add” button to open a new code editor.
Now, for this tutorial, let’s create a function that sends an email notification when a new conversation starts on your chatbot. Of course, this can only work if your server is already configured to send emails, either through an SMTP server or a third-party service. In this example, we will use only built-in WordPress functions. As this code is sending a mail using WordPress we want this code to run the server, so let’s use PHP.
function send_mail_notifier( $first_message, $topic ) {
    // Get the website admin email
    $admin_email = "[email protected]";
    // You can of course get your mail from an option if you have this setup already:
    // $admin_email = get_option( 'admin_email' );

    // Get the current date
    $current_date = date('Y-m-d H:i:s');

    // Check if user is logged in
    if ( is_user_logged_in() ) {
        $current_user = wp_get_current_user();
        $user_info = "User ID: " . $current_user->ID . "\n";
        $user_info .= "Username: " . $current_user->user_login . "\n";
        $user_info .= "Email: " . $current_user->user_email . "\n";
    } else {
        $user_info = "User: Guest\n";
    }

    // Prepare the email subject and message
    $subject = "Notification from your website";
    $message = "Date: " . $current_date . "\n";
    $message .= $user_info;
    $message .= "Message: " . $first_message . "\n";
    $message .= "Topic: " . $topic . "\n";

    // Send the email
    wp_mail( $admin_email, $subject, $message );
}
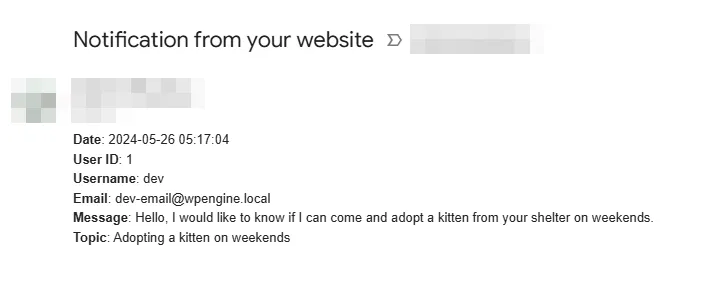
So the code above will effectively send you an email containing information about the user (if they are logged in), the content of the first message, and the initiated topic. If you are wondering how these parameters ($first_message, $topic) are going to be handled, don’t worry. The AI will determine these values for you, so you don’t have to do anything. Feel free to modify the code to fit your use case.
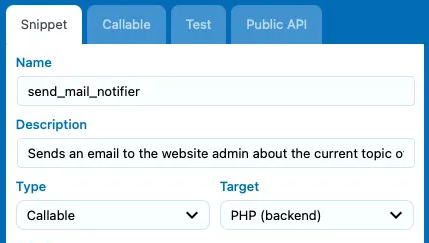
Now that the code is ready, we are going to paste it inside the Code Engine editor and make sure that we have selected the “Callable” type in the settings on the right panel.
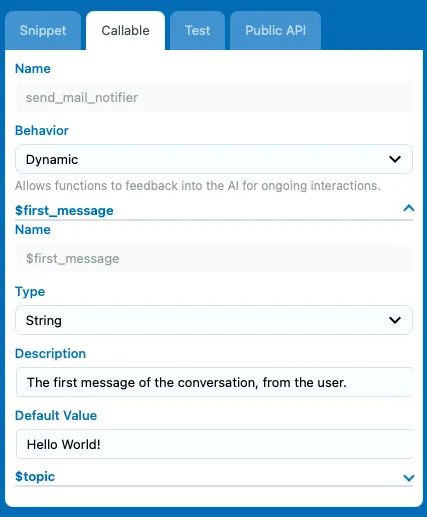
In the image above, we also inserted a description of what the code is supposed to do. The AI has access to this information, so it will help it understand why and when to use this specific code. We can also add descriptions for the parameters, as their usage may not be obvious to the AI. Consider these descriptions as “little prompts” that tell the AI what to use for each parameter.
Here are the different descriptions used in this example:
“$first_message: The first message of the conversation, from the user.”
“$topic: If the first message evokes a certain specific topic, specify it.”
You can also see a “default value” setting here. This is used if, for some reason, the parameter is null ( empty ), allowing you to manually choose a default value.
You can also choose the type of the argument—in our case, a message would be a string. But for more advanced usage, you can create functions that have numbers, arrays, and all kinds of other argument types.
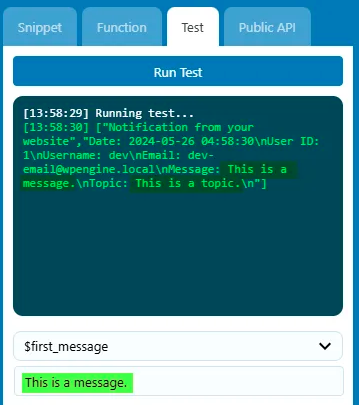
Before finalizing this code, you have the ability to test it to ensure everything is running smoothly and there are no mistakes in your code. This step is not mandatory, so you can skip it if you want, but it might be handy when you create your own snippets. What we are going to do is temporarily replace the function that sends us an email with an “echo” statement. This way, it won’t send anything, but we will have a chance to check the values that would have been sent in the “test console.” So, the last lines of our code should be replaced as shown below.
Now you can head to the “Test” tab. Here, you have the possibility to select all the parameters your function has and attribute them a test value. In the example below, the parameter “$first_message” has the test value “This is a message.” We don’t see it here, but the “$topic” has the value “This is a topic.” If you have previously inserted a “default value” for your parameters, you don’t even have to choose any test values; leaving them empty will cause the default value to be used. So, if we now run the test, we should see an output containing a preview of our email.
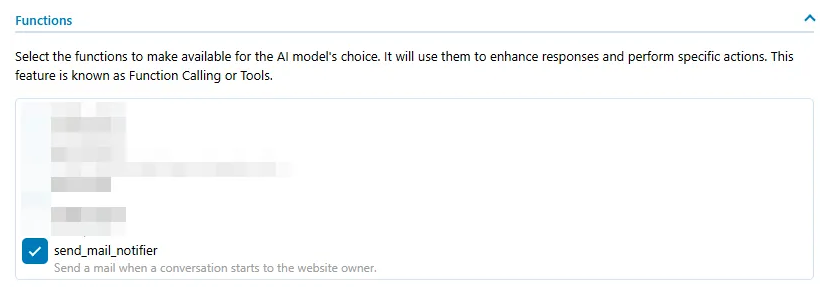
So far, so good! Don’t forget to replace that temporary “echo” statement back with the actual code to send an email, of course, because we are now ready to test it live with the chatbot. Go back to AI Engine, where you have your chatbot ready to use functions. You can now see in the “Functions” dropdown menu our newly created snippet. Just select it, and you’re done. Function Calling becomes that simple with AI Engine!
To make things extra clear for our Chatbot, let’s modify our instructions to specify that whenever a new conversation starts, it should use our function. Here’s the updated instruction for the current example:
“When a new conversation starts, use the send_mail_notifier function. This function will include the customer’s first message and the related topic. If there doesn’t seem to be a topic, such as only greetings or a simple question, ask the customer what specific topic they are inquiring about, and then use the function to send the mail. Once this function has been used, it should not be used again in the current discussion.”
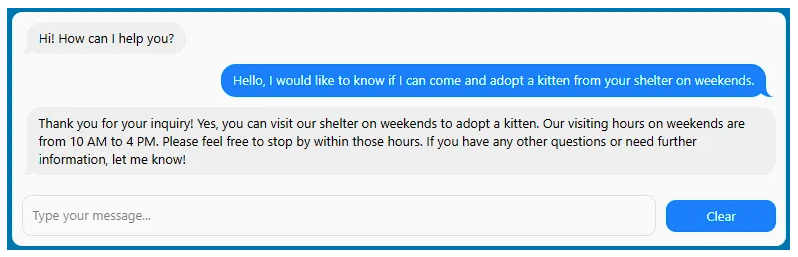
Feel free to adjust this for your specific needs. Now, let’s see it in action.
It sounds like everything is running smoothly! While the chatbot is engaging in conversation as usual, let’s check our email to see what’s waiting for us.
Beautiful! Imagine all that you can achieve with Function Calling. Now, it’s your turn to give it a try! Here’s a little exercise to see if everything is clear for you: instead of using “Notification from your website” as the email title, let’s use our “Topic” which will convey more information. It’s just a little tweak to do in the snippet code, but I’m sure you can handle it.
You now understand how to use function calling. Of course, this requires a minimum of technical knowledge. You can always use ChatGPT to help you, but it’s not yet as adept as a real developer, as it doesn’t fully understand the context of more complex use cases. So, use it at your own risk. Don’t be afraid to reach out to a freelancer; we have some really talented people who work with AI Engine in our Discord community. They will gladly enhance your AI Engine experience if you reach out to them.
In this example, we didn’t return any value from this function. It just runs a process on our server. But of course, you can return a value.
Returning a value
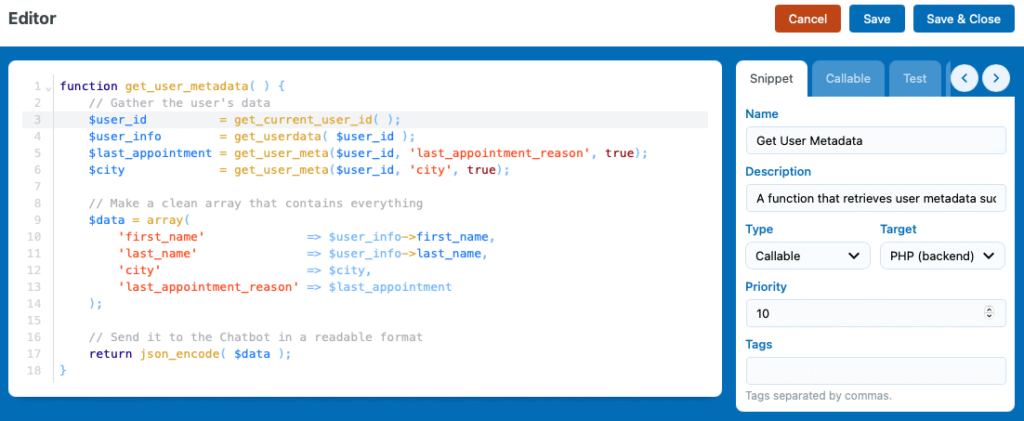
Here is a really quick use case: you need your chatbot to know your user’s personal information. Let’s create a function that does that in Code Engine.
And voila! Now our chatbot can get information about our users whenever it believes it is necessary.
The returned value lets the AI know the output of the function. For example, you could return a message like “the mail has been sent” or “the mail could not be sent” to let the AI know what happened during the function’s execution.
The return value must be readable. You can’t return an object or an array for instance, so make sure to use the json_encode() function whenever you return any value so make it bullet proof.
If your function call is something like a web search, you’ll of course need to return the search results so the AI model can use that information in its response. This return value becomes part of the context the model relies on to generate an informed reply.
Note that if the output of your function indicates an error and the type is dynamic, the AI might try to run the function a couple more times until it succeeds.
Front Function Calling ( JavaScript )
Of course, you can do the same things we just did with PHP, but on the front end—letting the AI run JavaScript snippets directly on your website.
Instead of selecting PHP, you just need to select JS as the callable type, and that’s it!
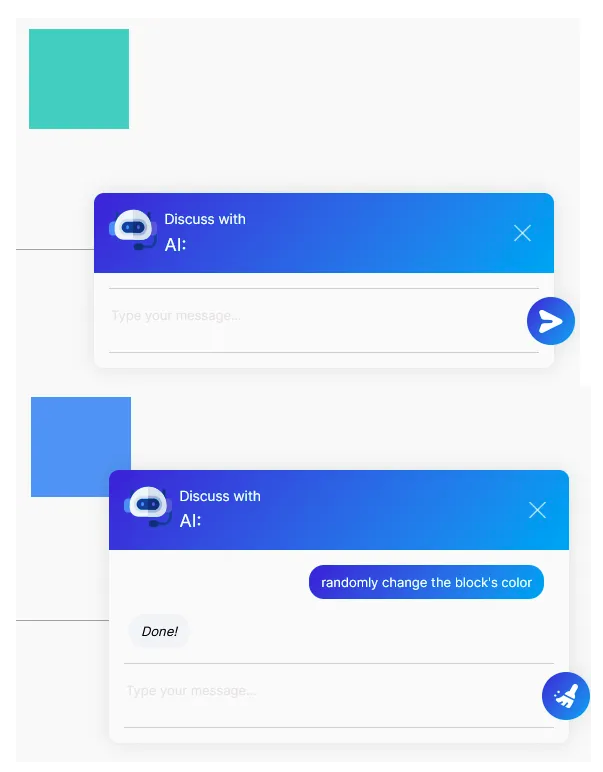
Imagine we have an element called “block” on our page. We’ll create a simple function to change its color to whatever the user wants.
const change_block_color = (color) => {
    const element = document.getElementById('block');
    if (element) {
        element.style.backgroundColor = color;
    } else {
        console.error(`Block not found.`);
    }
}
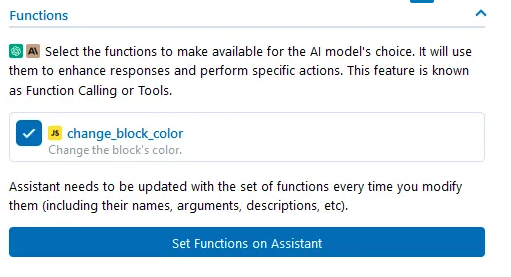
Once this is done, make sure you don’t forget to enable this function for your chatbot, or it won’t be able to trigger it. For this, like any other function, go into your chatbot settings and ensure you have checked the newly created function.
Then your chatbot will be able to execute this function as it will be declared in the DOM from Code Engine. Let’s see an example here:
Manual Function Calling
Part 1: Declaring Functions
There are two ways to declare functions for use with AI Engine:
Method 1: Register Functions Naturally
This filter allows functions to be selectable in the Chatbot’s settings, just like Code Engine registered functions. This is what we would call a “Naturally” added function.
The mwai_functions_list filter expects an array of functions objects (Meow_MWAI_Query_Function), not some raw declaration of your function. So, we will need to have a function to define it, which returns the expected object, then add it to the functions array and return it.
You can define your functions using Meow_MWAI_Query_Function::fromJson(). This method takes an array with the key attributes as a parameter and returns a Meow_MWAI_Query_Function object — which is exactly what AI Engine expects to build a function.
While you could technically create the object manually, fromJson() offers a simpler and cleaner way, especially if you’re working with JSON data. Just use json_decode() to convert your JSON into an array and pass it in.
function define_userInfo( )
  {

    $definition = [
      'id' => 'userInfo',
      'type' => 'manual',
      'name' => 'getCurrentUserInfo',
      'desc' => 'Get the current user information.',
      'args' => [
        [
          'name' => 'license',
          'type' => 'string',
          'required' => true,
          'desc' => 'User serial key.',
        ],
      ],
    ];


    return Meow_MWAI_Query_Function::fromJson( $definition );
  }
Method 2: Force-add Functions to the Query
This method adds functions directly to the query, meaning the chatbot will have context that this function exists when queried, but this will not be linked to the AI Engine chatbot settings. If you want to remove or add a function this way, you will do it through code altogether, every time.
The definition of the function itself is the same as before.
This won’t work with OpenAI Assistants, since functions need to be registered to the Assistants before being used.
Part 2: Handling Function Calls
Once functions are declared, you need to implement how they’re called. There are two approaches, depending on how you declared your functions.
If you declared them with Method 1 you need handle them with Method 1 as well.
Method 1: Provide Feedback to the AI Model
This method allows the AI model to process the function’s output and incorporate it into the final answer.
When the chatbot is queried, it will review the available functions it has access to and may choose to invoke one with a set of parameters.
At that moment, the mwai_ai_feedback filter is triggered. This is where your code steps in.
What you receive in the filter:
$value: This is what you need to return — the result of your function call. It must be a readable value, such as a string, integer, or JSON-encoded array/object (use json_encode() if needed).
$needFeedback: This array contains details about what the chatbot is trying to run, including:
$needFeedback[‘function‘]: the function ID the chatbot is attempting to call.
$needFeedback[‘arguments‘]: an associative array of the parameters passed by the chatbot (based on your function declaration).
What to do:
Extract the function ID from $needFeedback[‘function’].
Match it to your actual function logic.
Retrieve arguments from $needFeedback[‘arguments’][‘your_param_name’].
Run your logic and return a readable result via $value.
This method allows you to completely override the AI’s reply based on the function’s output.
This time, we’re not waiting for a specific filter to trigger in order to return the feedback value. Instead, we’ll directly use the mwai_ai_reply filter, which — as you may know — isn’t directly tied to function calling but allows us to modify the chatbot’s reply after it’s generated.
From there, you can access the feedback information via the $reply->needFeedbacks property. The process is the same as in Method 1: get your function ID, retrieve the arguments, and call your function.
The difference is that this time, you’ll need to manually modify the $reply object to include the result.
add_filter( 'mwai_ai_reply', function ( $reply, $query ) {
  foreach ( $reply->needFeedbacks as $index => $needFeedback ) {
    $function = $needFeedback['function'];
    if ( $function->id === 'userInfo' ) {
      $value = call_userInfo();
      if ( !empty( $value ) ) {
        $reply->result = "Here is your data: " . $value;
        unset( $reply->needFeedbacks[$index] );
        return $reply;
      }
    }
  }
  return $reply;
}, 10, 2 );
Implementation Notes
You can add this code to your theme’s functions.php file or use a snippet tool like Snippet Vault.
When declaring functions, use Meow_MWAI_Query_Function::fromJson() to define the function’s properties.
For functions with arguments, define them in the args array of the function definition.
Choose either Method 1 or Method 2 for both declaring and handling function calls.
Client-Side API (JS)
You can interact with the chatbots and conversations directly through JS. Have a look at the MwaiAPI object that it is available directly in your JS console. If you only use one chatbot, you can get the instance by using MwaiAPI.getChatbot(). If you have many, you can mention its ID as the first argument. For example, you could do:
let chatbot = MwaiAPI.getChatbot(); // Get the chatbot; if there are more than one on the same page, you'll need to pass the ID of the chatbot in argument
chatbot.open(); // Opens the chatbot if it's minimized
chatbot.ask("How are you?", false); // Sends a request (if true, the request will be send immediately)
chatbot.clear(); // Clears the chat
JS Filters
Modify the reply: ai.reply
MwaiAPI.addFilter('ai.reply', function (reply, args) {
  const { botId, chatId } = args;
  return reply + ' For more information, visit [Meow Apps](https://meowapps.com).';
});
Examples
Modify Every Reply with a Footer
MwaiAPI.addFilter('ai.reply', function (reply, args) {
  return reply + ' For more info, visit [Meow Apps](https://meowapps.com).';
});
Auto-Engage If User is Inactive for 30 Seconds
let inactivityTimer;
function resetInactivityTimer() {
  clearTimeout(inactivityTimer);
  inactivityTimer = setTimeout(() => {
    const chatbot = MwaiAPI.getChatbot();
    chatbot.ask("Still there? Let me know if you need help!", true);
  }, 30000); // 30 seconds
}

document.addEventListener('mousemove', resetInactivityTimer);
document.addEventListener('keydown', resetInactivityTimer);
resetInactivityTimer();
Show a Shortcut after a “result”
If you don’t know what a Shortcut is, it is basically a button that displays inside of the chatbot, you can learn more about it here.
MwaiAPI.addFilter('ai.reply', function (reply, args) {
    const { botId, chatId } = args;
    // Check if the reply is from the default bot (assumed ID 'default') and contains 'result'
    if (botId === 'default' && reply.toLowerCase().includes('result')) {
        let chatbot = MwaiAPI.getChatbot(botId);
        chatbot.setShortcuts([
            {
                type: 'message',
                data: {
                    label: 'Thanks',
                    message: 'Thank you!',
                    variant: 'success',
                    icon: null
                }
            }
        ]);
    }
    return reply;
});
Render chatbots dynamically
The chatbots are essentially shortcodes that create HTML elements on your page. These elements won’t mean anything to your browser and won’t render as chatbots until the AI Engine scripts are fully loaded and initialize them properly.
If you’re loading the chatbot dynamically—such as rendering the shortcode after the page has already loaded—the initial script that renders the chatbot will have already passed. As a result, your chatbot won’t appear automatically.
To fix this, you can manually trigger the initialization anytime after the scripts are loaded by calling the globally available function mwaiInitialize().
You can test it by typing mwaiInitialize() in your browser’s developer console.
In practice, you’ll want to listen for a specific event—like a popup opening or a button click—and then call this function to render the chatbot at the right time.
// Observe changes in visibility of the popup
const popup = document.getElementById('chatPopup');

const observer = new MutationObserver(() => {
  const isVisible = window.getComputedStyle(popup).display !== 'none';
  if (isVisible && typeof window.mwaiInitialize === 'function') {
    window.mwaiInitialize();
  }
});

// Start observing style changes
observer.observe(popup, { attributes: true, attributeFilter: ['style'] });
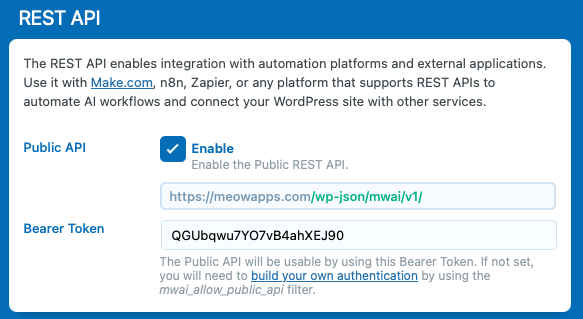
Public REST API
Every function from the PHP Functions is accessible through the REST API (https://domains.com/wp-json/mwai/v1/function_name). Use the POST method, with the parameters passed as JSON in the body.
First, make sure to enable the REST API to be able to use it. Go to the Settings tab, under the Remote Access section, and toggle the Public REST API.
Simple Examples
If you would like to run a simple AI query, you can do this:
POST https://yoursite.com/wp-json/mwai/v1/simpleTextQuery
{
  "prompt": "Give me a few facts about Bordeaux. Concise answer."
}
You can also chat directly with one one your chatbots:
POST https://yoursite.com/wp-json/mwai/v1/simpleChatbotQuery
{
  "prompt": "Hi! Who are you, actually?",
  "botId": "default"
}
Access Control
By default, the Public REST API is disabled completely. If you enable it, only authentified API requests will actually go through, otherwise they will be rejected. You can override this behavior in many ways and we will see a few examples. The Public REST API is also limited by the Limits set in AI Engine (either as Users or Guests, and System).
Authentified API Request
With WordPress REST API, to authentify your requests (which means they will be ran under a specific user in WordPress), you need to use nonces. Basically, you create the nonce on the WordPress side, for the current user, this way:
$my_nonce = wp_create_nonce( 'wp_rest' );
This nonce should be shared with the client (on the JS side, typically), then it can be used to make the requests, this way:
let nonce = "THE_NONCE_VALUE";
fetch('http://yoursite.com/wp-json/mwai/v1/simpleChatbotQuery', {
  method: 'POST',
  headers: {
    'Content-Type': 'application/json',
    'X-WP-Nonce': nonce
  },
  body: JSON.stringify({
    botId: "default",
    prompt: "Hello, who are you? What's up?"
  })
}).then(res => res.json()).then(console.log);
I don’t recommend it, but let’s say you would like to completely open the simpleTextQuery to everyone, or maybe for testing purposes. You can use the mwai_allow_public_api filter, which allows you to do this easily:
In this case, since the request is not authentified, the limits applied by AI Engine would be the ones related to the Guests. That said, you could also authentify them by force by calling the wp_set_current_user function. Be really careful when doing this.
Let’s say you are building an external app for mobile, or maybe calling AI Engine from a different website or system; you will need to create your own authentification. For this, I recommend using a Bearer Token. Don’t worry, it’s easy! Use the mwai_allow_public_apifilter to authorize the request. The $extra argument contains actually all the data about the incoming request. You can retrieve the token from it, and check if it’s the right one. You can secure it further by checking the IP address, etc.
add_filter( 'mwai_allow_public_api', function ( $allow, $feature, $extra ) {
  if ( !empty( $extra ) && !empty( $extra->get_header( 'Authorization' ) ) ) {
    $token = $extra->get_header( 'Authorization' );
    $token = str_replace( 'Bearer ', '', $token );
    if ( $token === "123456" ) {
      // You don't need to absolutely do this, but it's better to link a Bearer Token to an User.
      wp_set_current_user(1);
      return true;
    }
  }
  return $allow;
}, 10, 3 );
For a quick test using the Chrome Developers Tools, you could try this in the Console:
If you would like to access AI features easily through AI Engine, simply use the mwaiglobal. There will be more and more functions available to use. The API uses the whole AI Engine system, so you’ll get the statistics and limitations features as well.
simpleTextQuery( $prompt, $options )
You can use this function to simply run a query against the default model (turbo, currently). It’s as simple as that!
add_filter( 'the_content', function ( $content ) {
  global $mwai;
  $extra = $mwai->simpleTextQuery( "Write an one-liner about a cat introducing itself." );
  return $extra . $content;
} );
simpleChatbotQuery( $botId, $message, $chatId )
You can use this to discuss with one of your chatbots. The chatId is optional, but allows you to create a conversation. All the messages exchanged under the same chatId will be stored as a conversation. For this to work, you will need the Discussions to be enabled in the Settings.
This is similar to simpleTextQuery, except that it will return an array directly, representing the JSON. You can describe the attributes that you would like in the JSON in the prompt.
simpleVisionQuery( $message, $url, $path = null )
This is used to transcribe an image to text, based on your needs stated in the prompt. It is recommended to use an URL that points to your image, otherwise the path can be used and should point to a local file in your WordPress.
This allows you to upload a file either with a link or using base64, the same way AI Engine would do it through a chatbot, meaning you will get a refId and a URL for the uploaded file. With it, you can easily integrate this uploaded file into a chatbot query.
global $mwai;

// Download
$image_url = 'https://jordymeow.com/wp-content/uploads/2018/12/31081620120504.jpg';
$image_data = file_get_contents($image_url);
$base64 = base64_encode($image_data);

// Upload
$upload = $mwai->simpleFileUpload(
    null, // $file (null for base64)
    $base64, // $base64 data
    'gunkanjima.jpg', // $filename (required for base64)
    'vision' // $purpose
);

$file_id = $upload['id'];
echo "File ID: " . $file_id . "\n";

// Request
$answer = $mwai->simpleChatbotQuery(
    'default',
    'What do you see in this image?',
    [ 'fileId' => $file_id ]
);

echo $answer;
moderationCheck( $text )
Simply return true if the message has been flagged as unsafe to use.
PHP Classes
Meow_MWAI_Query_Text
You will find this usually named as $query and this class is used mainly for completion and chat. Here is an example on how to use it manually:
global $mwai_core;
$query = new Meow_MWAI_Query_Text( "Translate 'Hello World' into French." );
$query->set_env_id( '56xcfha6' ); // You can find this ID in your "Environments for AI"
$query->set_model( 'gpt-4-turbo' ); // Make sure this model is available in the set environment.
$reply = $mwai_core->run_query( $query );
echo $reply->result;
There are the main functions:
$query->set_message( $message ): Set the message (known previously as prompt).
$query->get_message( $message ): Get the message.
$query->set_messages( $messages ): Set the former messages.
$query->set_instructions( $instructions ): Set or override the instructions (known previously as context).
$query->set_env_id( $envId ): Set the environment ID. You can find it under “Environments for AI” in the AI Engine dashboard.
$query->set_model( $model ): Set the model.
$query->set_temperature( $temperature ): Set the temperature (0.8 by default).
$query->set_max_tokens( $maxTokens ): Set the max tokens (1024 by default).
$query->set_max_results( $maxResults ): Specific the number of results (1 by default).
$query->set_context( $context ): Add an additional context.
$query->replace( $search, $replace ): Replace a string by another string in the message.
$query->set_api_key( $apiKey ): Set it if you would like to override the API Key for this query.
Meow_MWAI_Reply
You will find it usually named as $reply. Here are the main functions:
$reply->result: Return simply the first (or only) result.
$reply->results: Return an array with all the results.
$reply->replace( $search, $replace ): Replace a string by another string.
$reply->get_in_tokens( $query = null )
$reply->get_out_tokens( $query = null )
PHP Filters
Backend Filters PHP
Interactions with AI
mwai_ai_query( $query ) => Modify a query before it’s made
mwai_ai_instructions( $instructions ) => Modify the instructions (you can add the current day, time, information about the current user, etc)
mwai_ai_allowed( $allowed, $query, $limits ) => Allow a query to be made or not
mwai_ai_reply( $reply, $query ) => Modify the answer before it’s sent (or do something at that time)
mwai_ai_function( $value, $funcName, $funcArgs ) => Inject the result of your own function, if in the case the function has been registered (function calling) and called by the model
mwai_ai_exception( $message ) => Modify the error message
mwai_estimate_tokens( $tokens, $text ) => Modify the estimated number of tokens for the given text (you can modify the default algorithm) used to calculate the tokens usage estimation.
Chatbot
mwai_chatbot_params( $params ) => Modify the final params just before the query is made
mwai_contentaware_content( $content ) => Handle extra use cases, like looking for content in specific fields, or handling page builders, etc
mwai_chatbot_reply( $rawText, $query, $params, $extra ) => Modify the answer before it’s sent.
Embeddings
mwai_pre_post_content( $content, $postId ): Get the raw content from the post. You can modify it to add your custom field, etc. AI Engine will clean that content further, and make sure it’s not too large for the AI model.
mwai_post_content( $content, $postId ): The final content that will be used. You can also modify this.
mwai_context_search( $query, $embeddingIndex = null ): Returns the embedding the most related to the query.
Forms
mwai_form_params( $params ) => Modify the final params
mwai_form_reply( $rawText ) => Modify the answer before it’s sent
Limits
mwai_stats_credits( $credits, $userId ) => Modify the number of credits (that allows you to create your own system)
mwai_stats_coins( $price, $stats, $atts ) => Modify the coins (that allows you to convert the price you personally pay to OpenAI to your own system of coins that you share with your users)
Others
mwai_languages( $languages ) => Modify the list of languages
mwai_allow_setup( $hasAccess ) => Allow access to the Settings of AI Engine in the Admin
mwai_allow_usage( $hasAccess ) => Allow access to the various screens of AI Engine in the Admin
Use MCP
What’s this all about?
Model Context Protocol (MCP) is the open standard Claude (and soon, others, such as ChatGPT) uses to talk to external “tool servers.” When Claude detects an MCP server it can:
list the server’s tools (tools/list),
ask the user to pick one, or decide autonomously, and then
call that tool with JSON‑RPC (tools/call).
With AI Engine installed, your WordPress site exposes 30‑plus tools that let Claude:
read / write posts, pages & custom post types
upload or generate media
manage categories, tags & any taxonomy
switch, fork, and live‑edit themes
list plugins …and more
The little Node script mcp.js is the bridge. It:
Opens an SSE stream to WordPress (/wp-json/mcp/v1/sse).
Translates Claude’s JSON‑RPC calls to HTTP POSTs (/messages).
Pushes WordPress responses back to Claude via stdout.
Cleans up automatically (sends mwai/kill, aborts SSE, exits) when Claude closes.
For advanced users only. This stack is still beta. You’ll need command‑line access, ability to restart PHP/FPM, and basic debugging patience.
1 · Install requirements
Requirement
Details
WordPress 6.x
REST API enabled.
AI Engine plugin
Folder wp-content/plugins/ai-engine.
Claude Desktop ≥ 0.9.2
macOS (tested) • Windows (paths differ).
Node ≥ 20.19.0
node -v — multiple versions? use nvm.
mcp.js handles everything else: it registers your site, edits Claude’s config, launches the relay, and terminates cleanly.
2 · Connect Claude to your site
# 1 · Register site + update Claude config
ai-engine/labs/mcp.js add https://example.com

# 2 · Launch a visible relay for the first test
ai-engine/labs/mcp.js start example.com
The first command writes an MCP entry to ~/.config/anthropic/claude.json (macOS/Linux) or %APPDATA%\Anthropic\claude.json (Windows).
Launch Claude Desktop. Within seconds you should see a plug icon (connected) and a hammer with ~30 tools.
3 · Prompt ideas
Level
Example
Simple
“List my latest 5 posts.”
“Create a post titled My AI Journey (one paragraph) and attach a media‑library image.”
Intermediate
“Look at the 10 newest posts, then publish a logical follow‑up. Re‑use existing categories & tags. If no image fits, generate one.”
Advanced
“Fork Twenty Twenty‑One into a grid‑layout theme called Futurism supporting post types Article & Project.”
4 · Hosting caveats
Each open SSE ties up one PHP worker. The number of PHP workers depend on your servers, your plan, etc. For example, with Kinsta, it’s generally between and 5 and 8.
If the site stalls
# Drop Claude’s MCP entry (disables auto‑launch)
ai-engine/labs/mcp.js claude none

# Restart PHP‑FPM or your container
sudo systemctl restart php-fpm

# Relaunch Claude
The relay auto‑kills itself, so stalls are rare; but under heavy traffic you might still need to bump PHP worker count.
5 · mcp.js CLI cheatsheet
# verbose relay (console output)
mcp.js start  example.com
# silent relay (Claude uses this)
mcp.js relay  example.com

# manage sites
mcp.js add     mysite.com      # register
mcp.js claude  mysite.com      # switch target
mcp.js list                    # show all

# ad‑hoc call (no curl)
mcp.js post mysite.com '{"method":"tools/list"}' <session_id>
Claude doesn’t send SIGTERM to its helper. mcp.js therefore:
Detects stdin close.
Sends a JSON‑RPC notification{ "method":"mwai/kill" } to /messages.
Aborts the SSE fetch.
Exits 0.
On the WordPress side the MCP module sees mwai/kill, ends its loop, and frees the PHP worker.
Windows note — the script is authored on macOS. On Windows native Node the shutdown works, but path separators differ. If you see lingering node.exe, try running the relay inside WSL 2 or add a process.on(‘SIGTERM’) shim.
Shortcuts and Blocks
Shortcut
A shortcut is basically a button that will be pushed by the server-side or directly in JS via the MwaiAPI (setShortcuts). Each shortcut has a type and data.
If you don’t want to code any of this to get Shortcuts in your chatbot you can use the Quick Actions add-on!
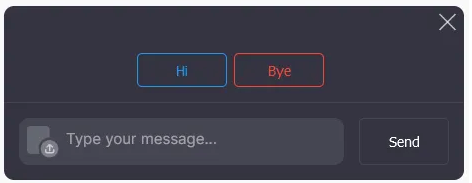
Message
The label will be displayed in a button in the chatbot. When clicked, the message will be sent to the chatbot. The appareance of the button can be customized through its variant and icon.
You can create these shortcuts either by using JS or PHP. This means you can create them dynamically by using the above actions as we have seen. Here are examples in both JS and PHP:
MwaiAPI.chatbots.forEach(chatbot => {
    chatbot.setShortcuts([
        {
            type: 'message',
            data: {
                label: 'Hi',
                message: 'Hello, nice to meet you, what can you do for me?',
                variant: 'info',
                icon: null
            }
        },
        {
            type: 'message',
            data: {
                label: 'Bye',
                message: 'Goodbye, see you soon!',
                variant: 'danger',
                icon: null
            }
        }
    ]);
});
add_filter("mwai_chatbot_shortcuts", function ($shortcuts, $args) {
    // The block will be added only if the word 'shortcut' is detected in the query or reply
    if (strpos($args['reply'], 'shortcut') === false && strpos($args['newMessage'], 'shortcut') === false) {
        return $blocks;
    }

    $shortcuts[] = [
        'type' => 'message',
        'data' => [
            'label' => 'Hi',
            'message' => 'Hello, nice to meet you, what can you do for me?',
            'variant' => 'info',
            'icon' => null
        ]
    ];

    $shortcuts[] = [
        'type' => 'message',
        'data' => [
            'label' => 'Bye',
            'message' => 'Goodbye, see you soon!',
            'variant' => 'danger',
            'icon' => null
        ]
    ];

    return $shortcuts;
}, 10, 2);
Block
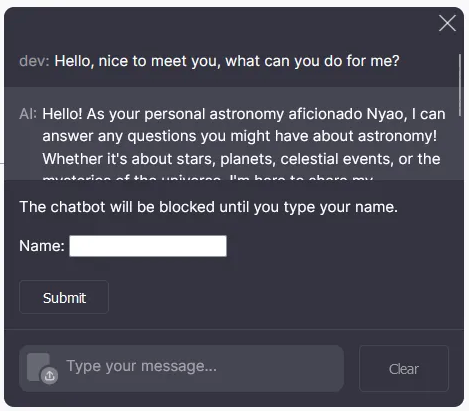
It’s just some HTML code that can be pushed either by the server-side or directly in JS via the MwaiAPI (setBlocks). A block also comes with script, so you can use custom logic and lock the chatbot if you want to. For instance, it could force a user to enter some data before continuing.
If you don’t want to code any of this to get Blocks in your chatbot you can use the Visitor Form add-on!
Content
You can create these Blocks either by using JS or PHP. This means you can create them dynamically by using the above actions as we have seen. Here are examples in both JS and PHP:
MwaiAPI.getChatbot().setBlocks([
  {
    type: 'content',
    data: {
      html: `
        <p>The chatbot will be blocked until you type your name.</p>
        <form id="userForm">
          <label for="name">Name:</label>
          <input type="text" id="name" name="name" required><br><br>
          <button type="submit">Submit</button>
        </form>
      `,
      script: `
        const chatbot = MwaiAPI.getChatbot();
        chatbot.lock();
        document.getElementById('userForm').addEventListener('submit', function(event) {
          event.preventDefault();
          const name = document.getElementById('name').value;
          alert("Hi " + name + "!");
          chatbot.unlock();
        });
      `,
    }
  }
]);