Every function from the PHP Functions is accessible through the REST API (https://domains.com/wp-json/mwai/v1/function_name). Use the POST method, with the parameters passed as JSON in the body.
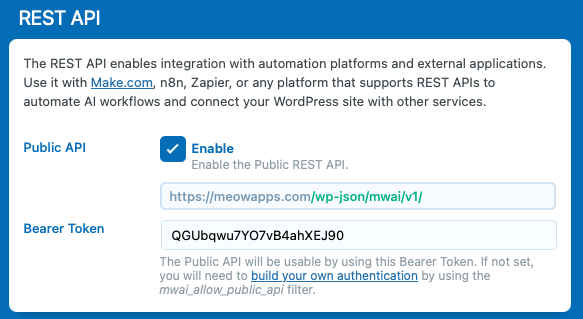
First, make sure to enable the REST API to be able to use it. Go to the Settings tab, under the Remote Access section, and toggle the Public REST API.
Simple Examples
If you would like to run a simple AI query, you can do this:
POST https://yoursite.com/wp-json/mwai/v1/simpleTextQuery
{
  "prompt": "Give me a few facts about Bordeaux. Concise answer."
}
You can also chat directly with one one your chatbots:
POST https://yoursite.com/wp-json/mwai/v1/simpleChatbotQuery
{
  "prompt": "Hi! Who are you, actually?",
  "botId": "default"
}
Access Control
By default, the Public REST API is disabled completely. If you enable it, only authentified API requests will actually go through, otherwise they will be rejected. You can override this behavior in many ways and we will see a few examples. The Public REST API is also limited by the Limits set in AI Engine (either as Users or Guests, and System).
Authentified API Request
With WordPress REST API, to authentify your requests (which means they will be ran under a specific user in WordPress), you need to use nonces. Basically, you create the nonce on the WordPress side, for the current user, this way:
$my_nonce = wp_create_nonce( 'wp_rest' );This nonce should be shared with the client (on the JS side, typically), then it can be used to make the requests, this way:
let nonce = "THE_NONCE_VALUE";
fetch('http://yoursite.com/wp-json/mwai/v1/simpleChatbotQuery', {
  method: 'POST',
  headers: {
    'Content-Type': 'application/json',
    'X-WP-Nonce': nonce
  },
  body: JSON.stringify({
    botId: "default",
    prompt: "Hello, who are you? What's up?"
  })
}).then(res => res.json()).then(console.log);
For more details about this, check the official documentation.
Full-Access to a Specific Feature
I don’t recommend it, but let’s say you would like to completely open the simpleTextQuery to everyone, or maybe for testing purposes. You can use the mwai_allow_public_api filter, which allows you to do this easily:
add_filter( 'mwai_allow_public_api', function ( $allow, $feature, $extra ) {
  if ( $feature === 'simpleTextQuery' ) {
    return true;
  }
  return $allow;
}, 10, 3 );
In this case, since the request is not authentified, the limits applied by AI Engine would be the ones related to the Guests. That said, you could also authentify them by force by calling the wp_set_current_user function. Be really careful when doing this.
add_filter( 'mwai_allow_public_api', function ( $allow, $feature, $extra ) {
  if ( $feature === 'simpleTextQuery' ) {
    wp_set_current_user(1);
    return true;
  }
  return $allow;
}, 10, 3 );
Custom Authentification
Let’s say you are building an external app for mobile, or maybe calling AI Engine from a different website or system; you will need to create your own authentification. For this, I recommend using a Bearer Token. Don’t worry, it’s easy! Use the mwai_allow_public_apifilter to authorize the request. The $extra argument contains actually all the data about the incoming request. You can retrieve the token from it, and check if it’s the right one. You can secure it further by checking the IP address, etc.
add_filter( 'mwai_allow_public_api', function ( $allow, $feature, $extra ) {
  if ( !empty( $extra ) && !empty( $extra->get_header( 'Authorization' ) ) ) {
    $token = $extra->get_header( 'Authorization' );
    $token = str_replace( 'Bearer ', '', $token );
    if ( $token === "123456" ) {
      // You don't need to absolutely do this, but it's better to link a Bearer Token to an User.
      wp_set_current_user(1);
      return true;
    }
  }
  return $allow;
}, 10, 3 );
For a quick test using the Chrome Developers Tools, you could try this in the Console:
fetch('http://ai.nekod.net/wp-json/mwai/v1/simpleChatbotQuery', {
    method: 'POST',
    headers: {
        'Content-Type': 'application/json',
        'Authorization': 'Bearer 123456'
    },
    body: JSON.stringify({
        prompt: 'Hello, who are you?',
        botId: 'default',
    })
}).then(res => res.json()).then(console.log);