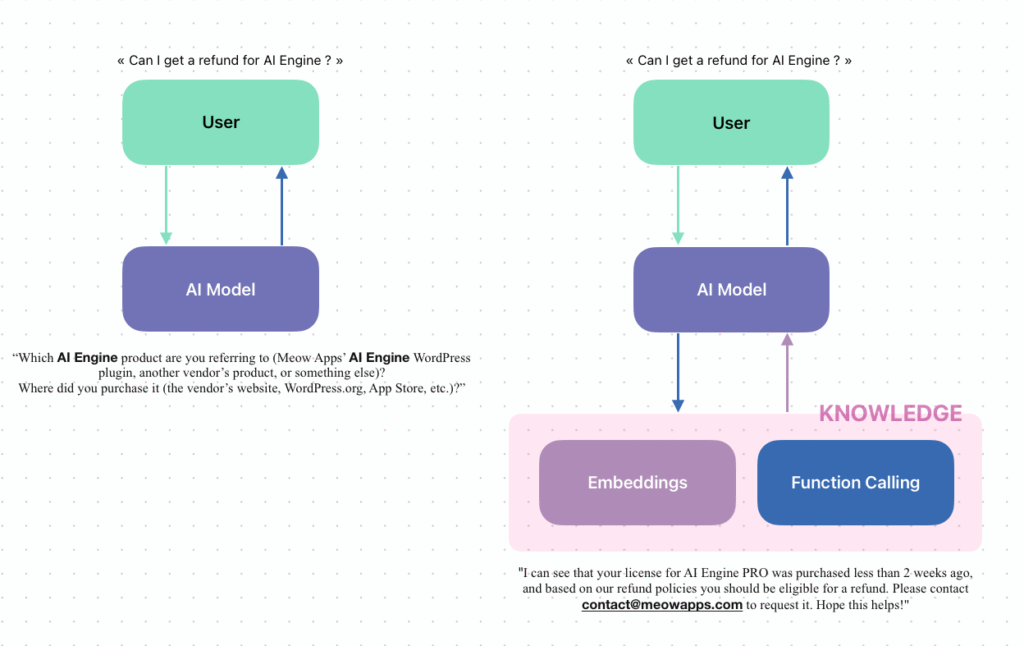
First, make sure you understand what embeddings are and what they’re used for. Please read this documentation to get a clear overview of the concept.
Before going into it, here is a quick visual representation of how embeddings works.

Now let’s see how to set them up in AI Engine.
1. Go to the “Dashboard” of AI Engine:

2. Enable the “Embeddings” option to display the “Embeddings” tab for later :

3(a). Go on Pinecone’s website and access your dashboard by login in. There create a new Project with the free tier starter plan.

3(b). Then head to the “API Keys” tab and you should see a “Default” one there. If not, please create one using the button “Create API Key“. Then use the eye icon “👁️” to display the value and copy it :

3(c). You can now create an index. Choose a name and dimensions. The dimensions should match what you have under ‘Default Environments for AI > Embeddings‘ inside the AI Engine settings. Simply use the ‘Setup by model‘ option and choose the one you want to use.
By default AI Engine uses 1536 (ada-3), so unless you have changed it, make sure it matches.


3(d). You can now get the “Host” value that we will use inside of AI Engine.

4. Go back to AI Engine and in the “Settings” tab, find the “Pinecone” section and insert the value of your previously copied API Key :

5. Enter you API key and the “Server” should match with your HOST :

In the above settings, you’re able to set the Min Score and Max Results. When a user sends a message in your chatbot, AI Engine transforms this message into an embedding and compares it with your existing embeddings to find the most relevant matches. But you already understand how embeddings work, right?
The “match” score represents the similarity between the query and an existing embedding, typically ranging from 0% to 100%. The Min Score setting allows you to define the minimum relevance required to consider an embedding a valid match. You may have multiple matches, and the system will consider up to the number defined in Max Results (e.g., 10).
Keep in mind that adding embeddings to the context will increase the total token usage. The larger or more numerous the embeddings, the more tokens are consumed. If some embeddings aren’t appearing in the context, it might be because your Max Content Length setting is too low relative to your Max Results setting. Make sure those values are balanced to avoid cutting off relevant matches.
6. Now, access the “Embeddings” tab of AI Engine:

7. On the right of your screen you should see a little window with a dropdown to select your created env.

- If you want to change your index settings you do so directly in the Setting tab of AI Engine under this section:

9. Everything should be setup correctly at this point. You can now add embeddings by clicking the “Add” button on the top left of this display.

Add Embeddings
Embeddings based on Posts
AI Engine includes built-in tools to help you generate embeddings based on your WordPress posts. This includes automatic synchronization when posts are modified and automatic deletion of embeddings when posts are deleted.
You can also choose a specific post type to use for embedding sync. This gives you flexibility—for example, you can create a custom post type (CPT) specifically dedicated to embeddings. This way, you can design advanced behaviors tailored to your content structure, using embeddings that are cleanly separated from your regular content. This setup is especially useful if you’re aiming to create dynamic interactions or content-aware chatbots.

In the Knowledge tab, on the right side of the dashboard, you’ll find the Sync Posts and Auto-Sync Posts sections. Here, you can easily configure the synchronization settings—everything is explained directly within the interface.
To get started, you’ll need to perform an initial manual sync. Just click the Sync All button to start generating embeddings from your selected post types. Once that’s done, the Auto-Sync feature will take care of future updates automatically whenever you modify or delete content, ensuring your embeddings stay up to date.
If Auto-Sync doesn’t seem to be working, it might be because WordPress Cron jobs are not executing properly on your server. This is a common issue on some hosting environments.
Make sure that:
- You don’t have a security plugin blocking WP-Cron.
- Your hosting provider isn’t disabling or restricting cron execution.
- You haven’t manually disabled WP-Cron in your wp-config.php file (look for define(‘DISABLE_WP_CRON’, true); and set it to false if present).
You can also test cron functionality using plugins like WP Crontrol to inspect and run scheduled events.
Embeddings based on PDF
To create embeddings from a PDF file, go to the Import Data section on the right side of the Knowledge tab and click the “From PDF” button. You can then follow the step-by-step process to create embeddings.

Make sure to click the “Select PDF File” button—do not try to drag and drop files directly, as this is not supported.